If you’ve ever dreamed of creating stunning images without holding a camera or a paintbrush, Midjourney is just the tool you need. This amazing tool combines intelligent artificial intelligence with creative design, allowing anyone – no prior experience required – to create impressive art using simple text.
This guide is designed to be your first step into the world of Midjourney. Here you will find simple and clear explanations on how to get started with the tool, how to use its basic functions, and how to create your first images. It is important to remember that Midjourney is a wide world full of possibilities – from advanced processing to style and shape customizations. But don’t worry, this guide focuses only on the beginning, so you can dive into the tool and start enjoying it quickly.
Over time, as you delve deeper and try new features, you’ll discover how much creative power it holds. But first, let’s start from the basics, step by step, on your way to becoming a Midjourney master.
Registering for Majorni and choosing a plan
The first step is to enter the official website: midjourney.com. Previously, the use of the tool was limited to Discord, which complicated access and use, but now you can start directly from the new interface.
● Sign up: If this is your first time, click “Sign up,” and you can use a Discord or Google account.
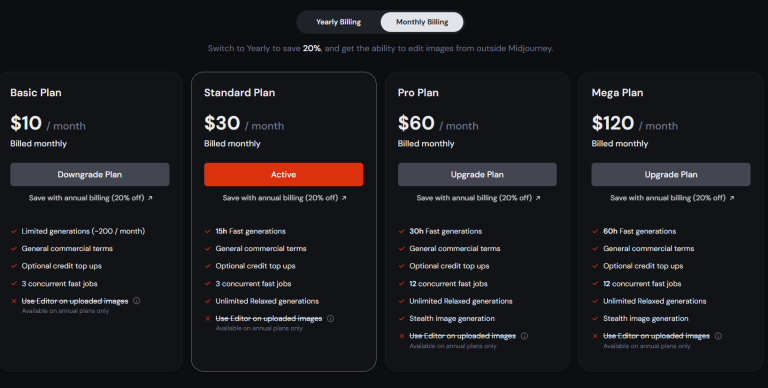
● Subscription plans: Midjourney offers a variety of subscription plans. The basic plan starts at $10 per month, but I recommend the mid-range plan ($30 per month).
Why this plan? There’s no limit on the number of images you create, no annual commitment, and it’s perfect for experiments that require a lot of repetitive processing.
Creating your first image in Midjourney
After you have registered and logged in, to start creating images, go to the top line of the screen – the prompt line.
What is a prompt?
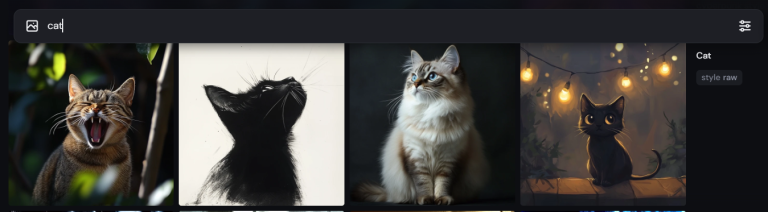
A prompt is the text you feed AI systems like Midjourney, which instructs them to create content based on your request. The prompt can be short and simple, like “cat,” or detailed and complex, like “illustration of a cartoon cat sitting on a park bench at night, Victorian style.” The quality of the prompt directly affects the quality of the result, so it’s important to formulate it clearly and precisely, incorporating details like subject matter, style, and even technical settings for aspect ratio and level of detail. The more focused and detailed you are, the closer the result will be to what you envision.
Type the prompt with your idea and click the submit button (or the Enter key)
Midjourney will create four different versions of the image.
Beginner tip: Start with simple requests, like “cat” or “tree at sunset,” to get a feel for how the tool works.
The perfect prompt formula
To achieve spectacular images, use this formula:
Format: What type of image? (illustration, photograph, drawing, etc.).
Topic: What does the image include? (e.g., “futuristic city”).
Details/Location: Add a detailed description, such as “neon skyline, flying cars.”
Style: What style? (e.g., “cyberpunk with a neon glow”).
Example of a prompt:
Illustration of a futuristic city, skyline with neon lights, flying cars, skyscrapers with digital billboards, neon orb.
Choosing a screen size and aspect ratio
Midjourney allows you to control the aspect ratio of the images:
To select the aspect ratio, click the settings button on the left side of the prompt bar.
Enlarging an image and creating variations
After we’ve created images, we can enlarge one of the images and continue working from there.
So if you’re happy with the result but not 100%, you can create additional versions of it.
Very Subtle: By clicking this button, Midjourney will create 4 additional versions of the same image but with minimal changes.
Very Strong: By clicking this button, Midjourney will create 4 more versions of the same image but with larger changes.
I created an image that I’m happy with. Now what?
Upscaling:
● Subtle Upscale: Improves the image quality while maintaining the original appearance.
● Creative Upscale: Adds new details and gives a more creative interpretation to the image.
Editing a photo I created using the editor
The editor is a powerful tool for upgrading and refining your creations:
Deleting parts of an image: For example, deleting a door and adding a “yellow window” in its place.
Enlarging the canvas: You can add space to the image according to predefined aspect ratios or define it freely.
Modify Prompt: You can edit the original prompt to change the image in a completely creative way.
In conclusion
Midjourney is not just a tool; it’s a gateway to a new world of creativity and digital art. This guide is designed to walk you through the basics – how to sign up, how to create your first image, and how to craft precise prompts that will help you achieve the results you dream of.
However, this is just the tip of the iceberg. Midjourney offers a host of advanced options and functions: enhancing resolution, creating variations, using existing images as a base, editing prompts, and even advanced image editing. Each of these functions can take your creation to the next level, but it all starts with the first steps you take here.
Remember, as with any artistic endeavor, working with Midjourney requires patience and perseverance. The more you try and experiment with different functions, the more you will discover the full potential of the tool. So don’t hesitate to play, experiment, and discover the artist within you – because with Midjourney, the only limit is your imagination.